Skin Creation
Contents
Instructions
1. Create a copy of the template skin folder located in /home/pi/RGB-Pi/images/skins and change to the name that you like.
2. Draw the different parts:
Backgrounds
It is recommended to leave the backgrounds as simple and plain as possible, using few and dark colours. This will improve the text readability.
NOTE: all system menus support independent backgrounds. You can create different BGs for every system option menues creating the corresponding files:
screen.png
screen_retroarch.png
equalizer.png
sound.png
sound_retroarch.png
bluetooth.png
control.png
control_retroarch.png
network_retroarch.png
ext_data_source.png
system_retroarch.png
information.png
system.png
advanced.png
game_menu.png
Bezels
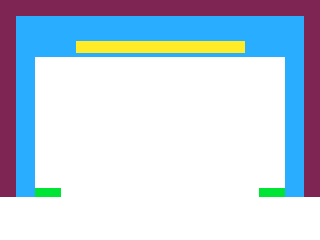
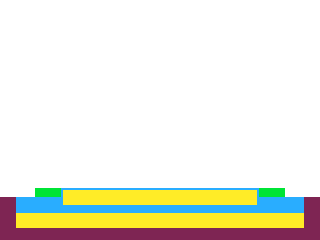
- Red area: this is the overscan area. Do not draw important things here since most TVs won't display this area.
- Blue area: this is the main drawing area. It is calculated in a very conservative way so that every TV will display its content.
- Yellow area: this corresponds to text areas so be careful with what you put here because text could result unreadable.
- Green area: this is an optional drawing area:
Bezels - Transparent
Make the adjustments to fit these transparency images into the bezel area. The simplest way is to make a selection in the bezel empty area and create a new image based on that selection. The recommended opacity is >= 50% for improving the text readability.
UI
- arcade-*, flag-*, freq-*, region-*: all of them corresponds to the different UI selectors.
- logo: it is the image displayed in the screensaver.
- selector-front-* and selector-back-*: these are the images used for the text item selectors. The front ones are displayed on top of the text and the back ones behind the text.
- NOTE: the back selector images are not provided in the template, so if you want to use the same you just simply make a copy of the front ones and rename them.
skin.ini
- position : used for setting the position of various elements.
- color : allows to make changes in the colour palette. It is suggested to make use of the colours used in the bezels images. There are a couple of special colours:
- indigo, which is used in folders.
- golden, which is used in some controller helper labels.
- NOTE: do note that this is a skin engine and not a theme engine. That means that we don't have nor want to go into more detailed granularity for making things easier. This also constrains a little the things you can do. In this case, Do note that changing a color affects all elements using the same.
- extra :
- item_indicator : enable or disable the default blinking triangle at the left of text items.
- text_shadows : enable or disable the 1px black shadow displayed on all UI text elements (including all icons).
Image Format
It is important that once you are happy with the results of your akin, you convert every single image to indexed color. The easiest and faster way is by installing ImageMagik. This is a CLI tool providing every kind of image manipulation options via command line.
This software also includes another tool called mogrify which fix and convert every image in a folder to the proper format by executing the following command mogrify *.png
Skins Repository
Here you can found a large number of skins make it by the RGB-Pi comunity arround the world

